Friday, June 10, 2011

Small Haul


So I recently went shopping and I have a small haul! This is actually my first haul! YAY! I wanted you guys to see what I got and get your comments and questions on the products. (: Here we go!

1. EOS Lip Balm in 'Lemon Drop' - This smells so, so, so good! And its moisturizing qualities are amazing! My new favorite lip balm, hands down.

2. Maybelline's Dream Mousse Blush in 'Soft Plum' - After hearing so many people rave on and on about the Dream Mousse Blush in 'Peach Satin', I knew I had to try it. But when I did, the color was too light for me. This color is amazing, the texture is so smooth and soft, and the shimmer just perfect. This is the perfect cream blush for summer.

3. Covergirl Natureluxe Silk Foundation - Because of the amazing variety of colors, it took me literally two days to find my perfect color. (I had to return the first two colors I had purchased.) This is amazing, has great coverage, and feels amazing on the skin. I am in love.

4. Revlon Super Lustrous Lipcolor in 'Coralberry' - Have I mentioned that I'm sort of in love with peaches and corals this year? This is an amazing color! It has taken me at least two months to find a pretty coral that wasn't too frosty. I plan on wearing this often.

5. Revlon Colorburst Lipgloss in 'Papaya' - I put this on as soon as I bought it and worked it into a tutorial as well! It has amazing pigmentation (even more than the lipstick!) and is very light on the lips. The formula is not sticky at all and the packaging is adorable. This is my new favorite product.

6. The bracelets (the first and last in the column) are from Aeropostale. They have a very homemade, simple look to them and they look great stacked together. I love them. Also, the turquoise bracelet I got from a local street market. I love it, it can worked into practically any outfit!

So, that's it! Tell me if you'd like me to do more hauls. (:

DIY: Snazzy Sneakers

I know this is a mostly beauty related blog. But I recently broke out my Sharpies, colored all over my Converse, and realized that you guys might like to see the results! So, here you are. (: I am pretty pleased with the results and can't wait to wear them!

http://1.bp.blogspot.com/-5-N6nmdsMjE/TfKol6Ml4wI/AAAAAAAAAOE/5wjEH9-m7Xk/s200/IMG_4749.JPG

http://4.bp.blogspot.com/-YK_W7DK5Qr4/TfKoZ2KIEQI/AAAAAAAAAN0/iVEAVnhp_FY/s200/IMG_4750.JPG

http://2.bp.blogspot.com/-weIAr_DzCso/TfKomKBVCPI/AAAAAAAAAOM/jPqgecPwLdg/s200/IMG_4753.JPG

What You Will Need;

- A pair of sneakers you can color on

- Black Permanant Marker

- At Least 3 Colorful Permanent Markers

- Wet Papertowel

1.Take the wet paper towel and wipe down the white part of the sneaker. If that doesn't clean most of it up, try using nail polish remover. Then, wait until it dries.

2. Take a sharpie and make small shapes, such as triangles and rectangles, all over the sneaker. Make sure they "fit in" with each other.

3. Color in the shapes so that no color touches the same color. Try to keep the colors evenly spaced out.

4. Wait until they dry and show them off!

Sunday, June 5, 2011

Nature Photography

As the weather changes where I live, I've found more and more opportunities to get outside with a camera. These are a few of the pictures I've taken. Hope you guys like them. (:


Sunday, May 22, 2011

Bold with Blue


Give your eyes some sparkle with blue eyeliner on the lower lashline. This will give the neutral eye a fresh, summery pop of color as well. Because it is so simple, this look is a great casual, playful look that can be worn anywhere. I've worn it many times myself and I love it!

1. Prime your eyelids with a good primer, such as NYX's Eyeshadow Base. Make sure to apply a bit under your eyes and to the inner corners to keep the shadows lasting long.

2. Apply a shimmery champagne colored eyeshadow, like Estee Lauder's Pure Color Eyeshadow in 'Glistening Gold', to the browbone to highlight it.

3. Sweep a shimmery brown color over the whole lid for a wash of color. I love how Estee Lauder's Pure Color Eyeshadow in 'Sandbar Beige' gives a brightening effect to the eyes.

4. Apply a warm, chocolate brown color, such as Estee Lauder's Pure Color Eyeshadow in 'Hot Cinnamon' to the crease and outer 'v'. Keep this light, you don't want too dark of a color on your eye.

5. Take a small liner brush, such as the MAC 209 Eye Liner Brush, and carefully line your lower lashline with a bold, bright blue. I love MAC's Eye Shadow in 'Freshwater'.

6. Using a small brush, apply a shimmery light colored highlight, like MAC's Eyeshadow in 'White Frost', on the inner corner.

7. Finish off with a black eyeliner on the lash line and mascara. I love Covergirl's Liquiline Blast and Maybelline's Full N' Soft Mascara.

Hope you guys enjoyed this look(:

Smoky Plums And Greys


This is a pretty, softer version of the traditional smoky eye, using various shades of gray and plum to create a eye brightening evening look. Toned down, this could also work for day looks as well. I've worn this out a few times and have loved how it illuminates the face. Hope you like it!

1. Prime your eyelids with a primer. Then, apply a highlight color to your browbone and inner corner. I used MAC's 'Shroom' eyeshadow.

2. Apply a very light lilac color to the whole lid. I used the lighter color in the Victoria's Secret Eyeshadow Duo in the color 'First Glance' for this. Then, with a small, fluffy shader brush, apply the dark, shimmery color into the crease very lightly.

3. Take a small fluffy, angled brush and pack it with a matte dark plum color. I used a color from an Estee Lauder palette, however MAC's 'Trax' eyeshadow is a good dupe for that color.

4. Line your eyelid with a dark liner, such as L'oreal Telescopic Precision Liquid EyeLiner. Then, line about 1/3 of your waterline from the outside with a black pencil. I used Covergirl's Liquiline Blast Eyeliner.

5. Finish off with a good mascara. I love L'oreal's Voluminous Mascara.

Well, there's the look! I love wearing this as a lighter formal look. This is perfect for summer as well. Hope you guys enjoyed it! (:

Thursday, May 5, 2011

My Photography

Hello, everyone!(:
Now, I know this is mainly a beauty and fashion blog, however, my camera decided to cooperate with me these past few weeks, so I took a ton of pictures of random things.
Sooo, this will be a quick post of just my pictures. (:

So, those are a few pictures. Tell me what you think(:

Covergirl LashBlast Fusion Mascara Review

It seems as though literally everybody has tested out this mascara! However, I chose to stay true to my Maybelline Full N' Soft. It's not often that I pick up products to just randomly test, especially not mascara. It's quite hard to find a good mascara, so when I do, I stick to it. However, since it seemed as though everyone except for me had purchased one of these, I decided to pick a tube up for about $9 while I was at my local drugstore.

So, this is what the tube looks like. Pretty snazzy, isn't it? I love the color and the shiny lettering. It looks really nice.
The first thing I noticed about this mascara, was the applicator. It has a very, very big applicator, and I was so afraid I would poke my eyes with it. However, I got the hang of it in a bit, and loved using it. The applicator is shaped a bit like a comb, separating lashes.
However, the formula was a bit too clumpy for the price. It took a bit to separate lashes after a coat.

This is what my lashes looked like after one coat;

In conclusion, I will not purchase this again, but I will probably use up the whole tube.

Monday, April 18, 2011

Glittering Green Eyes Tutorial


1. Follow your usual foundation routine. Then, apply a peachy pink blush to the apples of your cheeks and up your cheekbones to your temples. I used Estee Lauder's Silky Powder Blush in 'Sweet Nectar'. Again, on the website, the color looks very muted. It's much more vibrant in reality.

2. Contour your cheekbones with some bronzer and then use a powder brush to dust some bronzer all over your face. The bronzer I used was Maybelline's Fit Me Bronzer. It has a bit of shimmer in it as well to illuminate your face.

3. Next, prime your eyelids with a good eyeshadow base or primer to make your eyeshadow look vibrant and keep it on longer. I used NYX's Eyeshadow Base.

4. Highlight your brow with a shimmery champagne color, such as Estee Lauder's Pure Color Eyeshadow in 'Glistening Gold'. Also, apply some to the inner corners of the eyes so make them look brighter and wider.

5. Then, apply a shimmery forest green color to the entire lid using a MAC 213 Brush. I used Estee Lauder's Pure Color Eyeshadow in 'Ivy Envy'.

6. After this, apply a darker green color, such as Estee Lauder's Pure Color Eyeshadow in 'Emerald Star' in your crease and outer 'v'. Then, sweep a gray-green color into about half the eyelid from the outer 'v'. I used Estee Lauder's Pure Color Eyeshadow in 'Enchanted Forest'.

7. Line your upper lashline with a dark black liner, such as L'oreal's Telescopic Precision Liquid Liner. Then, use a pencil liner on about 1/4 of your lower lid under your lashes. Also, line your waterline. I used Ulta's Automatic Eyeliner in black.

8. Apply a coat of Maybelline's Full N' Soft Mascara for thick, long lashes.

And you're done! Hope you guys enjoy this look! :)

Saturday, April 16, 2011

Top 5 Nail Polishes

I love painting my nails different colors. I've noticed I've been gravitating towards matte bold colors a lot lately. Here are my top five most worn nail polishes recently. I hope you enjoy them as much as I do.

1. 'No Spain, No Gain" by OPI. I am in love with this color, and actually have it on at the moment. This is a beautiful matte berry, purple color. This picture does no justice to the gorgeousness of the color, I'm afraid. Hopefully, you get the idea of what a pretty color this is. With only one coat, you get a rich color on your nails. What more could one ask for?

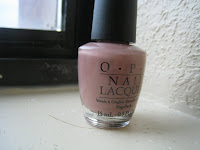
2. "Barefoot in Barcelona" by OPI. This is my go-to nail polish. It's a matte nude pink-y taupe color I really, really like. It goes with any outfit I can possibly think up and looks great with it too! It's a little bit of a warmer color than it looks like it the picture.

3. I didn't have many high hopes for this nail polish after already purchasing one years ago from Claire's. This I bought from their new line called Icing. However, I was definitely proved wrong after buying this; there's nothing wrong about it at all! The color is a gorgeous dark gold which looks great with just one coat and stays on for quite the while. I really like it!

4. "Russian Navy" by OPI was a purchase I made back in the fall, when the black nail polish trend was going on. I think black nail polish is a bit of a harsh color on anyone's nails, so I opted for this rich navy with purple undertones. And am I glad I did! This is a perfect color for the fall and the winter and looks very elegant, yet trendy.

5. This is a color I used to wear all the time, and then I completely forgot about. I recently came upon it while cleaning out my drawers. And I'm so glad I did! I plan on wearing this as much as I can during the spring and summer. This is a gorgeous matte color that looks very bright, even bordering neon on the nails. The sophistication of red and playfulness of orange, all in one bottle on gorgeousness.


Well, those are my top 5 nail polishes right now. Yours?

Tropical Sunset Eyes

Hey everyone! As the warm weather has been approaching, I've started to bring out my warmer, more daring shades. I've been wearing this look and I love it! It makes the whole face look as though it's glowing, very dewy and fresh. This would be great worn to school or at night, being as versatile as it is. I hope you guys like it!

1. Apply your foundation and concealer as usual. Then, apply a cream blush to your cheeks. Think of this as a base for your real blush. It will make your blush look more natural and keep it from fading. I used a really old cream blush by Clinique in 'Sweet Cheeks' that I doubt they sell any longer. A good alternative would be Revlon's Cream Blush in 'Berry Flirtatious'.

2. Then, apply your powder with a kabuki brush. Try to stay very light with the powder as you want dewy, fresh looking skin for this look. I used Covergirl's TruBlend Minerals Powder with an Avon Kabuki Brush.

3. Next, prime your eyelids with a an eyelid primer, such as NYX's Eyeshadow Base.

4. Apply a shimmery champagne color to the browbone and the inner tearducts using a small shader brush, such as MAC's 239 Brush. I used Estee Lauder Pure Color Eyeshadow in 'Glistening Gold'. This makes the eye look wider and brighter.

5. Then, apply a copper color, such as the second color from the left in the Maybelline Color Plush Silk Eyeshadow Palette in 'Copper Chic', to the whole lid with a MAC 231 Brush. Next, apply a orangish gold color to the space between the copper and highlight color, with the other side of the brush.

6. Apply a warm plum-y brown color in the crease and outer 'v' of the eye. I used Estee Lauder Pure Color Eyeshadow in "Smoky Ember".

7. Line your upper lashline with a black liquid liner, such as L'oreal's Telescopic Precision Liquid Eyeliner.

8. Apply a coat of Maybelline's Full N' Soft Mascara for thick, long lashes.

9. Apply a peachy colored blush to the apples of your cheeks. I used Estee Lauder's Silky Powder Blush in 'Sweet Nectar'. On the website, the color looks very dull and muted, but in real life, the color is a gorgeous orange-ish peach color. I love it.

10. Finally, finish off the look with a nice, nude lipstick and berry tinged lipgloss. I love my Bobbi Brown Lip Color in 'Bare' topped off with Maybelline's Shine Sensational Lipgloss in 'Sparkling Grape'.

I hope you all enjoyed this look. (: Feel free to message me or comment with requests, questions, or suggestions!

Monday, April 11, 2011

Update

Hello!
I'm so sorry I haven't been posting quite as frequently. Most of this past weekend was spent filming a cover of "Jar of Hearts" by Christina Perri with the greatest friend ever named Ava. I love you, Ava! :D

If you'd like to watch it, just click here.

More posts coming up soon. (: I promise!

-Aza

Friday, April 1, 2011

Coral Lips

Coral/Orange lips have been quite a big trend so far this spring. Yet, without proper makeup, they can end up making one look like a clown. This is my way of wearing this fun trend. This is more of a party/nighttime look, but with the smudged eyeliner, it can easily be transformed to a natural day look. Enjoy(:


1. Apply your foundation, concealer, and powder as usual. Try to stay light with the powder. For this look, you want to have dewy, fresh, and healthy looking skin.

2. Next, prime your eyelids. I used NYX Eyeshadow Base in 'Skintone'.

3. Apply a champagne colored highlight to the brow bone and near the tear ducts using a small shader brush, such as MAC's 239 Brush. I used Estee Lauder Pure Color Eyeshadow in 'Glistening Gold'. This will make the eye look bigger and brighter.

4. Then, apply a shimmery light brown taupe color, such as Estee Lauder Pure Eyeshadow in 'Hot Cinnamon' to the entire lid using a large shader brush. Then, blend it in with the highlight with a blending brush, such as MAC's 217 Brush.

5. Next, apply a warm, deep brown, such as Estee Lauder Pure Eyeshadow in 'Chocolate Bliss' to the crease and outer 'v' with a small shader brush, such as MAC's 231 Brush. Sweep a little bit of this under the lower eyelid, very close to the lashes.

6. Line your upper lashline with a black eyeliner pencil. I used Covergirl's Liquiline Blast Eyeliner. Smudge the line for a smoky effect. For a more casual look, keep the line close to the lashes and do not smudge. Line the waterline as well.

7. Finish the eyes with a good mascara. I used Maybelline's Full 'N Soft Mascara.

8. Sweep a nude rosy blush up your cheekbones and a little on the apples of your cheeks. I used Estee Lauder's Silky Powder Blush in 'Nude Rose'.

9. Finally, apply a coral lipstick, such as Estee Lauder Pure Color Long Lasting Lipstick in 'Coral Fantasy'. This is a limited edition lipstick that I have, so another option would be the Revlon Super Lustrous Lipcolor in 'Siren'. Finish of with an orange or red tinged sheer lipgloss. I used my Liplicious Lipgloss in 'Cherry Gelato' from Bath and Body Works.

Thursday, March 31, 2011

My Favorite Spring Trends

1. Sheer Layers
Play naughty, yet nice, with sheer clothing with a tank paired underneath. Designers came out with many sheer patterns for their new 2011 spring collections. These designers would include Dolce & Gabbana, Nina Ricci, Prada, Miu Miu, and Chanel. Sheer clothing always tends to add an elegant edge to any outfit. So far, I've only got a few sheer pieces in my wardrobe. But I plan to change that with a trip to the mall. (;

2. Simplistic Clothing
I'm in love with this trend. Before, I thought it was a bit boring. Yet, after I tried it out, I realized why designers such as Jenni Kayne designed such look. The simple silhouette draws the eye to the figure and really compliments it. It also draws attention to the face. I'm really looking forward to wearing this trend.
Jenni Kayne Spring 2011 Ready-to-Wear
3. Lace
Yet another naughty, feminine, and pretty look was spotted during spring 2011 fashion trends. This trend popped up on the runways in the forms of dresses, tops, skirts, and more. Paired with a plain cami, a lace top would be so easy to pull off. I was quite pleased with this classy trend, and will be looking forward to incorporating it into my wardrobe.
the lace spring 2011 fashion
4. Finally, my most favorite spring trend has to be colorblocking. At first, I thought it would look a bit too colorful for everyday wear, but after seeing such pretty designs by Marc Jacobs (who is, in my opinion, the best designer to ever grace the planet), I was sold. This is such an easy trend to wear, and most don't even need to go out and buy new things. Just wear colorful pieces all together.
the living color spring 2011 fashion


So, these have been my favorite spring trends. What are yours? Comment below or shoot me a message(:

Tuesday, March 29, 2011

Just a hello. (:

Hello there! Once again, I find I must start off a blog post with a phrase I find myself using more and more often. I'm so sorry I haven't been able to post as often as I (and perhaps even you) would like myself too. However, I've been busy for what seems like an eternity with class projects, finishing up show choir, exercising like I'd planned to, modeling school, and what not.

So, yesterday, I took my final modeling exam at my modeling school. I got my results and am pleased to announce I have passed with an "A". (: I'm so ready to show off my hard work at graduation in June.

So a quick outfit and face of the day;

Outfit;
teal, ruffled dress. - forever 21
black leggings . -forever 21
ballet flats. (in black) -forever 21
flower ring (in gold) - forever 21
No, I promise I'm not obsessed with Forever21. (; Haha, just kidding. My mom and I were in the mall, shopping, and picked up some things at Forever21. I'm not sure if I should do a collective haul later. :/

Face;
Neutrogena Tinted Moisturizer
Clinique Cream Blush in 'Sweet Cheeks'
Covergirl TruBlends Minerals Powder
Estee Lauder Blush in 'Nude Rose'
Nars Laguna Bronzer
Maybelline Color Sensationals Palette in 'Copper Chic'
L'oreal Voluminous Eyeliner
Maybelline Full N' Soft Mascara.
Bobbi Brown Lip Color in 'Bare'
MAC Lustreglass in Star Nova.

That's pretty much it. (: Going to watch a play with some friends today (my friends are in it.) I was in the play last year. Yet, this year, I tried out show choir, so I didn't get to have the opportunity to do the play again. :(

Thanks for reading!

Wednesday, March 23, 2011

Lush Reviews

I recently bought a ton of goodies from Lush, and I enjoyed all of them immensely. For those of you who don't know of Lush, it is an amazing store for bath, shower, hair care, skincare, and cosmetic products. Anyways, here are my thoughts on the products I purchased. If you'd like to know more about the products, just click on the links.

Lovebirds Soap
This was a limited edition soap for valentine's day which I managed to pick up around the first of March. I've been using it for about a week now, and I've loved it! This soap smells amazing with hints of vanilla and jasmine. The scent lingers softly on the skin, yet not very strongly so it isn't going to clash with perfume or anything of the sort. This soap is very creamy and, in turn, lathers very nicely. It is also very moisturizing, and after only a week, my skin has become so incredibly soft! I will definitely try to snag another chunk of this soap before it goes away. :(
Demons In The Dark Soap
Another soap I purchased was the "Demons in the Dark" soap. I wasn't quite sure if I would like this soap, but after smelling the product, I knew I had to pick it up! The scent of this soap smells very strongly of mint and clove, yet one can smell hints of fresh green apple juice as well. A very clean and pleasing scent, I must say. It definitely wakes me up when I use it. However, after using it, I realized a few things. One; it doesn't lather too well. Two; the scent of this soap can clash with sweet perfumes. Three; the soap is slightly drying on the skin. Four; this soap lasts for quite the while! Five; this soap leaves green stains on the counter. Though the stains can be removed easily, they are still a pain, I believe. I probably will buy this soap again, however, because of how it wakes me up and how long it lasts.
Dorothy Bubble Bar
I am in LOVE! This produces the strongest, frothiest, best bubbles I have ever seen! This smells amazing and turns the water a calming, cool shade of blue...and then the color goes away by itself, not even staining the tub! I love this bubble bar! However, this was my first bubble bar, so I'll try a few more before buying this one again.

So, these are the few I've tried from the products I bought. All in all, I really enjoyed them. (:


Saturday, February 19, 2011

Manicures are always fun & look so elegant. Yet, who has time to keep going to the salon? Try your own manicure at home with these simple steps. (:


1.Soak your hands for 2-3 minutes in warm soapy water. Keep a washcloth near by the sink to dry hands after.


2.Wash your hands with a softening hand soap. I use Mary Kay's Satin Hands Satin Smoothie Hand Scrub in Vanilla Sugar
.


3. Soften your hands with Lush's Handy Gurugu Hand Cream


4. Remove any old polish still remaining on your nail.


5. Clip & file your nails. I use a Revlon nail clipper and file.


6. Apply a cuticle oil or cream to your cuticles.


7. Apply a base coat and let it dry. (I couldn't find my base coat to take a picture of. :( ) I used Sally Hansen's Insta-Grip Fast Dry Base Coat.


8. Apply a nail polish of your choice. I used OPI's Barefoot in Barcelona, a beautiful nude, pinkish color.


9. Apply a top coat to keep your nail polish on longer.


10. Decorate your nails in any way you want. Glitter, stickers, & gems look so cute on nails. (: Finish off with another coat of top coat.


Hope you liked it(:
Please comment with requests, questions or...well, comments. (:

"Luxury must be comfortable..."

"...otherwise it is not luxury."
- Coco Chanel.

I'm Aza, a girly girl who absolutely adores makeup, the art of dressing oneself, and elegance. I love Victorian dresses, tea parties, and practically anything vintage. This blog is just to be a way to help others with the few tips and tricks I know. I'll also be posting random blogs here about ... well, just life. (:

Enjoy ♥
- Aza

P.S. All products mentioned in any review, haul, or tutorial will be bought by myself. I will give my honest and true opinion and will tell if I am being compensated by a company.